Some simple tips for improving your photography
Read the Manual
It’s boring and it’s long, but even if you only pick up a few snippets of information, it’s important to read the manual.
Break it into chunks - you don't need to read it all (unless you want to).
Use a highlighter pen and highlight the areas that you need the most help in understanding (such as Metering, Autofocus and Custom Settings).
Alternatively, download the manufacturers instructions to your mobile phone, so they are always with you and ‘bookmark’ each page so you can turn to them quickly
There is nothing worse than been out in the field with the perfect light and trying to found out which button does what. I guarantee that you WILL miss the shot that you have waited most of the day for.
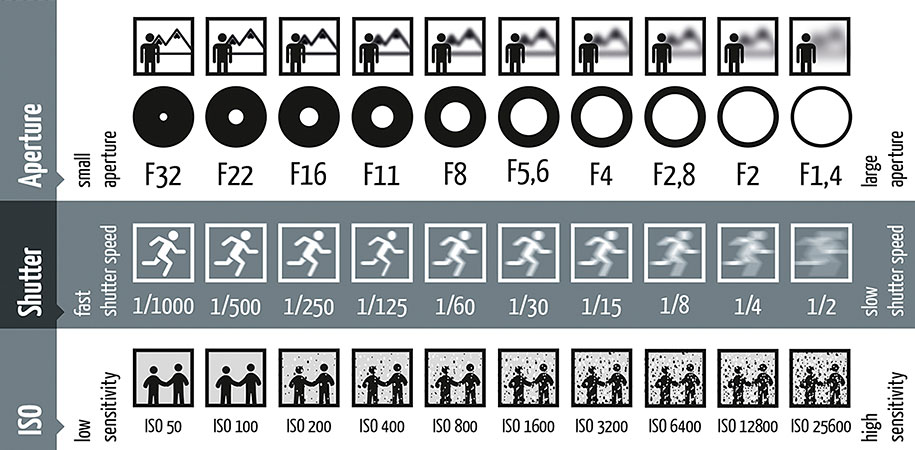
Shutter Speed
ALWAYS pay attention and be aware of your shutter speed.
If your shutter speed is too slow, your subject will generally be blurry and out of focus.
If you are holding your camera by hand (i.e., not using a tripod) try to aim for a shutter speed of at least 1/100 for general shots (though I would suggest double the focal length).
You also need to ensure that when you are using longer lenses, regardless of the above example, you should always shoot (as a bare minimum) at the same focal length (i.e if your shooting with a 300mm focal length, you need a minimum 1/300’s to avoid camera shake)
(* 1) see the diagram below which shows how Shutter Speed, ISO and Aperture interact with each another and how changing one setting, effects the other
The Golden Hour
The Golden Hour is usually the hour just after sunrise or just before sunset.
It gives you a great chance of capturing some of the best lighting as the land starts to warm up (sunrise) or cool down (sunset).
Personally, I find that the best light is round about half an hour either side of sunrise and sunset.
You can photograph the most stunning landscape at any time of day, but if you shoot at midday, the light can be very harsh and can result in flat, uninteresting light.
During Golden Hour, the sun is low in the sky, casting a soft, diffused light in warm and sometimes vibrant tones.
If you have a landscape in mind that you want to photograph, or you have already taken that shot, but it hasn't come out the way you want, visit the location at different times and see what a difference a bit of dramatic lighting can make.
You can take your photography to another level entirely by shooting during this period.
Framing and Composition
Think about the whole of your frame when you take a photograph, not just the subject in front of you.
Keep an eye out for any obvious problems in the background before you take the shot, (lampposts and hedges protruding from your subjects heads).
A good tip is to compose the shot and then cast your eye around the four sides of the frame for distractions or unwanted objects.
Think about whats in the picture, before you press the shutter. If there is something in your shot that shouldn’t be there, move and recompose the shot.
Always take the time to look around - the better light, might be just over your shoulder.
Fill the frame
The biggest mistake that beginners make, is leaving too much space in the frame.
You can either zoom in or get closer, it’s up to you, but you need to make it clear to your viewer that this is what your subject is. Be bold with your composition.
The best way to zoom in to your subject, is by using your legs. Walk nearer the subject and get closer to it / them.
Filling the frame also cuts out the clutter that can be a compositional distraction.
Practice
To quote a great photographer, ”your first 10,000 photographs are your worst".
Many beginner photographers are far too hard on themselves, expecting perfection too soon.
Learn from your mistakes. Making mistakes (and more importantly learning from them) will give you the experience that allows you to create the images you want to take, in the future.
Think about your shot, before you press the button. Slow down, watch the light and look at what you are shooting at see which angle or position
Whatever the weather, get out and about and practise and make the most of the conditions available to you. There is no such thing as bad weather.
Always have a camera with you, even if you only have a small compact or a mobile phone, there is nothing worse as a photographer than missing the shot
Don’t be too hard on yourself and don’t give up.
Lighting
Think about the lighting in every photograph you take.
Photography is after all ‘painting with light’ and it’s all too easy to get engrossed in the view, while forgetting how important the lighting is and how a small chink of light, could turn the shot into a masterpiece.
Always be ready to shoot, the light may only last 30 seconds or even less.
Next time you take a photograph, don't look at the subjects in the frame, look at how the subjects are lit.
Very simply, the lighting can make or break an image.
Rule of thirds
What is the rule of thirds ?
Try to avoid placing your subject right in the middle of the frame.
Compositionally, photographs work better if your subject is at a point where the lines of the 'Rule Of Thirds' grid bisect, like in the red circles in the diagram below.
Just knowing a few simple tips around the rule of thirds can immediately improve your photography.
After a while, you tend to find that you automatically photograph this way, without thinking about it.

General ideas
- Get it right in camera - don't assume “I can sort that in photoshop later”, get it right now.
- Leading lines - try use leading lines in your photograph, draw your viewer into your picture. Use a stream, a fence, a wall and so on.
- Don't rush out and buy all the latest kit - Use what you have and learn to use it properly.
- Check your horizon is level - It is very important to get your horizon level (its especially noticeable at the coast when shooting out to sea). Use a spirit level, the level on your tripod (or purchase a mini spirit level for a couple of pounds).
- Get out and explore your local area - by foot.
- Look for all opportunities to shoot something a little different from the norm - they are around you and usually right under your nose.
- If all your photographs are blurred - check the obvious and make sure your camera or lens have not been switched to manual focus.
- Always re-charge your cameras batteries before heading out (and check you have sufficient memory cards)
To download this information in PDF format, please click here
(*1) * the ISO / Aperture / Shutter Speed chart is courtesy of Daniel Peters (www.hamburger-fotospots.de/index.html) and is by far the best way I have seen of demonstrating ISO, Aperture and Shutter Speed